Last Updated: February 25, 2026 — Reviewed by Brian Hayes, Licensed Master Plumber
Let’s face it; there’s nothing more frustrating than dealing with a leaky faucet or a burst pipe. Not only can they cause significant damage to your property, but they can also drain your wallet with high water bills. However, the good news is that repairing leaks in your home’s plumbing doesn’t have to be a daunting task. With some basic knowledge and a bit of elbow grease, you can get your plumbing system back in tip-top shape.
Identifying Leaks

The first step in repairing leaks in your home’s plumbing is identifying them. Common signs of leaks include dampness, mould and mildew growth, water stains on the wall or ceiling, and a musty odour. You may also notice a decrease in water pressure or an increase in your water bill. Once you identify a leak, turn off the water supply to that area to prevent further damage.
Locating Leaks
After identifying a leak, the next step is to locate its source. Start by checking the exposed pipes in the area where you noticed the leak. Look for any visible cracks, corrosion, or damage. If you do not find any visible signs of damage, check for dampness or water stains on the walls or ceiling. A damp spot may indicate that the leak is coming from a hidden pipe, and you may need to use specialized equipment to locate it.
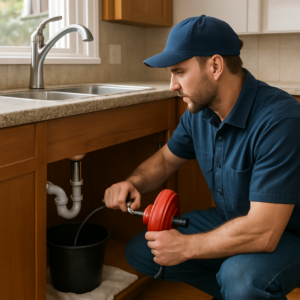
Repairing Leaks

Once you have identified and located the leak, it’s time to fix it. Here are some common plumbing leaks and how to fix them:
1. Leaky Faucets: Leaky faucets are a common plumbing problem that can be fixed easily. Start by turning off the water supply to the faucet. Next, remove the handle and the nut that holds the cartridge or stem in place. Replace the damaged parts, reassemble the faucet, and turn the water supply back on.
2. Leaking Pipes: Leaking pipes can cause significant damage to your home if left unattended. Start by turning off the water supply to the affected area. Next, use a pipe cutter or hacksaw to cut out the damaged section of the pipe. Replace it with a new section of pipe and use coupling or solder to join the new pipe to the existing one.
3. Toilet Leaks: Toilet leaks can be difficult to detect, but they can waste a lot of water and increase your water bill. Start by turning off the water supply to the toilet. Next, remove the tank lid and check the flapper valve. If it’s damaged, replace it with a new one. If the valve is not the problem, check the fill valve and the gasket between the tank and the bowl.
4. Showerhead Leaks: Showerhead leaks can be caused by a damaged washer or a loose connection. Start by turning off the water supply to the shower. Next, remove the showerhead and check for any visible damage to the washer or the O-ring. Replace the damaged parts, reattach the showerhead, and turn the water supply back on.
Final Thoughts
Repairing leaks in your home’s plumbing is not only about preventing damage to your property, but it’s also about being a responsible homeowner. By fixing leaks promptly, you are doing your part to conserve water and reduce your environmental impact. Additionally, tackling plumbing repairs can be a satisfying DIY project that can save you money and give you a sense of accomplishment. So, the next time you notice a leak in your home, don’t ignore it. Grab your tools, turn off the water supply, and get to work. With the tips and tricks provided in this guide, you’ll be able to handle any plumbing leak like a pro!
Fix your damaged plumbing with the help of Hayes Plumbing. We are residential and commercial plumbers that provide leak repair in Oshawa. From beginning to end, you can trust our seasoned experts to handle your plumbing worries. Get in touch with us today!
Additional Resources
Frequently Asked Questions
How do I detect a hidden leak related to plumbing leak?
Signs of a hidden leak include unexplained water bill increases, damp spots on walls or ceilings, musty odours, and mould growth. Hayes Plumbing uses professional detection methods to locate leaks in Oshawa homes.
How much does plumbing leak repair cost in Oshawa?
The cost of plumbing leak repair in Oshawa depends on the location and severity of the issue. Hayes Plumbing provides a clear quote after assessment so you know the cost before we begin any work.
Does home insurance cover plumbing leak damage in Ontario?
Most Ontario home insurance policies cover sudden water damage but not gradual damage from leaks that were ignored. Hayes Plumbing recommends regular inspections to catch issues early.
Need help with leak detection and repair? Hayes Plumbing & Bathroom Renovations serves Oshawa, Ajax, Whitby, Clarington, and Pickering. Contact us or call (905) 576-3043 for a free estimate.