Last Updated: February 25, 2026 — Reviewed by Brian Hayes, Licensed Master Plumber
Arguably the most overlooked feature in the whole room, the bathroom mirror is something you don’t realize how much you need until it’s damaged. Whether you’ve spotted black spots creeping across the glass or noticed a hairline crack, the good news is that many bathroom mirror problems can be repaired without a full replacement.
With time, bathroom mirrors can show signs of ageing, black spots, or even cracks. If your mirror is looking less than brand new, don’t toss it just yet. Below, we’ll walk you through practical repair methods for the two most common bathroom mirror issues — and explain when it’s time to call in a professional.
How to Fix a Cracked Bathroom Mirror

However it happens, a crack in a bathroom mirror is annoying, especially when your mirror is mounted directly to the wall. If the crack isn’t too serious, you can repair it yourself with a glass repair kit — the same type used to fix small windshield cracks, available at most hardware stores in Oshawa and Durham Region.
What You’ll Need
- Soft cloth
- Glass cleaner
- Glass repair kit (includes stabilizer, syringe, resin, and curing film)
- Razor blade
- Microfiber cloth
Step-by-Step Repair Instructions
- Clean the crack thoroughly with a soft cloth, being sure to remove all dirt and debris from the crack and the surrounding area.
- Apply the stabilizer — remove the adhesive backing from the stabilizer strip and apply it over the crack to cover the damage. Smooth out any air bubbles.
- Inject the resin — fill the kit syringe with resin and insert it into the crack through the stabilizer. Inject the resin until the crack is completely filled.
- Let it cure — allow the resin to cure for as long as recommended by the manufacturer before peeling off the stabilizer.
- Apply the finishing coat — once the stabilizer is removed, apply a small amount of resin to the cured, filled crack. Cover this immediately with the curing film. Remove the film after the top layer of resin has cured.
- Clean up — if necessary, remove any excess resin with a razor blade, then clean with a microfiber cloth and glass cleaner.
Important: This method works best for small hairline cracks. If the crack is large, deep, or has created loose shards, replacement is the safer option. Cracked mirrors can pose a safety risk, especially in homes with children.
How to Remove Black Spots on Bathroom Mirrors
Black spots on bathroom mirrors are more than just an eyesore — they’re a sign that moisture has damaged the mirror’s reflective backing. While black spots don’t necessarily affect the structural integrity of a mirror, they tend to spread over time if the underlying moisture problem isn’t addressed.
What Causes Black Spots?
The most common causes of black spots (also called “mirror rot” or “desilvering”) include:
- Cleaning products seeping behind the glass — spray-on cleaners can work their way past the edges and corrode the mirror’s silver backing
- Bathroom humidity and moisture — steam from showers condenses on and behind the mirror, gradually breaking down the reflective layer
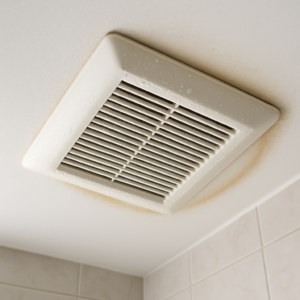
- Poor ventilation — bathrooms without proper exhaust fans trap moisture, accelerating mirror deterioration
- Age — older mirrors naturally degrade as their protective sealant wears away over time
DIY Fix: Aluminum Foil Patch Method
If you want to save the mirror you have, there’s a practical quick fix using materials you likely already own:
What You’ll Need:
- Aluminum foil
- Clear adhesive tape
- Screwdriver (if mirror needs to be removed from frame)
Instructions:
- Determine whether you can access the backside of the mirror without damaging the frame or the mirror itself. If you can’t, this method won’t work.
- Remove the glass from the frame using the appropriate hardware (screws, clips, etc.).
- Identify where the black spots are from the front, then flip the mirror over.
- Tear off small pieces of aluminum foil and tape them over the black spots with clear adhesive tape, making sure the shiny side of the foil faces the back of the mirror and the foil is as smooth as possible.
- Once all spots are covered, replace the frame or backing and rehang the mirror.
Professional Resilvering
For a more permanent solution, you may consider professional resilvering — a process that strips and reapplies the mirror’s reflective coating. This is especially recommended for vintage or antique mirrors that may contain mercury. Professional resilvering restores the mirror to near-original condition and is more durable than the foil patch method.
Preventing Future Mirror Damage

The best way to deal with black spots and deterioration is to prevent them in the first place. Here are practical tips for homeowners in Oshawa and Durham Region:
- Improve bathroom ventilation — make sure your bathroom has a properly functioning exhaust fan that vents to the outside, not into the attic. Poor ventilation is the number one cause of mirror rot in Canadian bathrooms.
- Spray cleaner on the cloth, not the mirror — this prevents cleaning solution from seeping behind the glass edges.
- Apply edge sealant — a thin bead of clear silicone around the mirror’s edges can prevent moisture from reaching the backing.
- Run the exhaust fan for 15–20 minutes after showering — this reduces the overall humidity level in your bathroom.
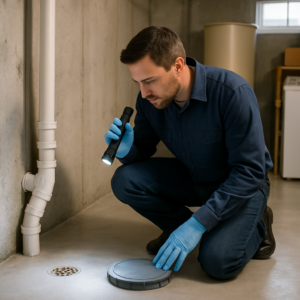
- Address plumbing leaks promptly — a dripping faucet or leaky pipe behind the wall adds moisture to the room. Schedule a leak detection and repair appointment if you suspect hidden leaks.
When to Replace Instead of Repair
While DIY repairs can extend the life of a bathroom mirror, some situations call for full replacement:
- Black spots cover more than 20–25% of the mirror surface
- The crack is long, deep, or has created loose fragments
- The mirror is part of a bathroom renovation project
- The mirror frame is also damaged or outdated
If you’re planning a bathroom update, replacing the mirror is an opportunity to upgrade to a fog-resistant, LED-lit, or custom-sized option that better suits your space.
Moisture Problems? Address the Root Cause
Many mirror problems in Durham Region homes trace back to excess bathroom moisture. If you’re noticing frequent condensation, peeling paint, or musty odours alongside mirror damage, the root cause may be inadequate ventilation or a hidden plumbing issue. Our team can help diagnose and resolve moisture-related problems with professional plumbing inspections and fixture upgrades.
Need help with bathroom mirror issues or moisture problems? Contact Hayes Plumbing at 905-576-3043 for expert service throughout Oshawa and Durham Region.
Additional Resources
Frequently Asked Questions
When should I call a plumber for black spots bathroom mirror?
You should call a licensed plumber for black spots bathroom mirror when the issue persists after basic troubleshooting, involves water pressure changes, or requires access to pipes behind walls. Hayes Plumbing serves Oshawa, Ajax, Whitby, Clarington, and Pickering.
How much does black spots bathroom mirror cost in Durham Region?
The cost of black spots bathroom mirror in Durham Region depends on the complexity of the job and parts required. Hayes Plumbing provides upfront pricing before beginning any work so there are no surprises.
Should I try DIY or hire a professional for black spots bathroom mirror?
While minor issues can sometimes be addressed with DIY methods, black spots bathroom mirror often requires a licensed plumber to ensure the work meets Ontario plumbing code. Hayes Plumbing is fully licensed, WSIB certified, and BBB accredited.